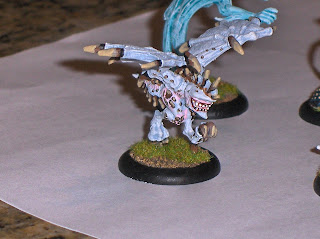
I managed to finish my Thagrosh model tonight (5.5 hours total). I had the usual "smurf" bad camerea issues, but this time I brought the photos into Photoshop and did a simple image>adjust>auto levels which cleaned them up quite nicely. They still look a little better in person, but now the photos look much closer in color. As usual I tried to do a few things new with this model. Most noticeably this model has it's eyes painted, which is something I have not done before. I kind of did them reverse all black, then white in the cennter; because I though it just looked menacing. I did a better job of blending when I painted his horns going from a blue black to grey white that I like pretty well.
Also of note (but not so visible in my crappy camerea shot) is that after mat coating this model I came back and painted his gorey back bits and his chest stiches with a clear glossy finish by hand. It really manages to 1) brighten up the red almost to what the GW wash looks like wet (which I love much more than the muted look after it dries) 2) It makes it have that still frsh wet look.
The last new thing I tried is pretty minor. For the cloak, instead of the usual base coat plus highlight layer I based in straight black and then watered down my colors 25% color to 75% water and painted on two layers to get the coloring I wanted. I think this achieved the same effect only it looks more blended and pro-like-cool then my personal ability to achieve the same affect using normal methods ever could. Of course this adds an extra step of drying time which slows down the painting process even more. To make the stiches really pop I ran over them with a extra watered down (read 1:3 H2O) GW blank ink to help darken where the pieces of fabric and stiches meet - nice black lining effect. Then I ran over them with the stiching color. Same thing for the chest stiches only I used a very small amount of GW red wash then I came back with a very small brush and applied black ink just to the skin crease.
October 21, 2008
The Thagrosh Have Eyes Too
October 13, 2008
The Shepherd has come
After painting so many units, I decided to reward myself by painting a few single figures. It's really nice to actually start and finish something the same night. For some reason my camrea was being finicy again and made my figure look smurf like. At least the back view shows the skin closer to it's normal hue. After this it's back to priming some more figures tomorrow after work. Oh, and this one took exactly 3 hours from start to finish.
Raptors Finished
September 26, 2008
Incubi Complete
Last night I finished up my incubi. They look really nice. I'll try to talk Mike into helping me get a better photo, otherwise they will just have to wreak havok on the gaming table. 14 hours total. Just under 3 hours a fig. While that is a tad higher than my average with the swordsmen, these models had a lot more detail and over twice the number of painting steps. Alsi I barely used the fine detail brush for anything on these models. They were almost entire painted with a regular detail brush!
September 22, 2008
Incubbi Test
Tonight I painted my incubbi test model. They are perhaps one of my favorite units this army has as these dragonspawn burst out of fallen troopers to claim revenge on unseuspecting foes. The basic paint job is similar to the swordsmen, only with about 6 more layers of paint around the red (bloodier) areas of the model. While the picture doesn't show it very well the red areas look a bit wetter which looks extremely nice. Unofrtunately I will lose that effect once I clear coat the model as it tends to dull everything. I might have to pick up a small bottle of glossy clear coat and hand paint it on over the fleshy areas to ensure they stay wet and gory looking. To do the red shading I painted the skin blue (like the other models) first. Then I painted a whiter color over the areas I wanted even redder. Used the new Games Workshop red wash, Highlighted with a pink color. Washed everything red again to dull out the pink (and make it redder) and finally highlighted once more with just a very small amount of pink to achive that third level of highlight. I am glad I only have five of these models to paint as it is a lot of work and took about 3-4 hours to complete. I can speed some of that up as I had to wait for a lot of drying time as there were four layers of skin washes overall.
September 16, 2008
20 Swordsmen Complete
So tonight I finally finished my swordsmen! I spent 12 lining the armor, 3 nights at 5-6 hours a piece painting up the rest of the details and about 5 hours basing & painting the front arcs on all 20 figs. That's 35 or so hours (perhaps even closer to 40 in case I miscalculated). That's an average of 2 hours per fig! They all look great like the test fig or better however I no longer have Mike's awesome setup for photography and I must say I am completely blown away at how crappy the photos turned out. If I saw these things on eBay I'd laugh and say no way would I ever buy this crap. I think it's only in part due to the light box, but mostly due to this camera having a really bad macro function. I'll have to look into acquiring a better brand.
Alas, even though they look crappy I've uploaded the images as proof that my job is complete. I'll have to get a better picture at some point.
September 1, 2008
Going Down to Yuma
August 5, 2008
Enter the Angelius
Two nights and 6 hours later I have finally finished the Angelius. Since the scales were so smooth I opted to not try to highlight the head and mess the figure up. I added smaller scales to this fig similiar to how I did the Carnivean and the effect is really growing on me. The rock this figure is wrapped around is from my back yard and colored with extremely watered down browns, blue and yellows.
Stealing an idea I got off the privateer press web side I went back and painted all of the front arcs on my figures a shade of grey to ease game play mechanics.
August 3, 2008
You gonna finish eating that?
I spent entirely too much time on this piece. 14 hours to be exact, the Carnivean is just to detailed of a piece. I wanted to keep the same theme as my Shredders so I added extra scaley spots. While I used the same higlight colors as I did with the smaller models it does seem more cartoony on this larger model but I am still ok with that. My camera is still turning the bodies blue even though they are mostly white with a slight blue grey hue. Next up will be the Angelius.
July 28, 2008
The Legion of Everblight has arrived!
My wife and kids have left town for three months while we wait for our new house to be built. While they are gone I have 1 mission, paint over 1000 points of new in the box Legion of Everblight miniatures.
I have a few ground rules:
- Nothing gets played until I paint it
- Everything that can be pinned gets pinned
- Paint it and move on, no repainting
This weekend I finished my first few models and here are the pics. Remember I am not a professional and I have painted less than 25 models in my lifetime so BE KIND.
Meet the Team
The Ferralgeist. I decided to make him blue rather than green.
Looks super blue in this photo (actually white) gotta love yellow lights.
I call him mini me!
With the exception of Sayern I am extremely happy with all of the other models. Sayern is ok but faces are hard. I love that most of the Legion Models do not have any eyes! Next up is the Carnivean. Unfortunately tonights a wash as I spent time doing this and recovering my World of Warcraft account.
Subscribe to:
Posts (Atom)